Wednesday, August 14, 2013

It's official!! My classroom is DONE!

I am SOOO excited to annouce that  after days and weeks of work, (Seriously started the end of July)my classroom is DONE! Just in time for a successful back to school night full of lots of families and third graders! (27 to be exact).  I am thrilled with how my room turned out and I hope that you enjoy looking at my new favorite place.

I have to say, I had lots of family and friends jump on board to help me with some of my projects.  My chair backs were painstakingly crafted by my mom and I on Friday afternoon.  My wonderful boyfriend created my writing center shelf that I love, and of course as I mentioned before, my colleague Brian, who helped me move and move file cabinets. My classroom vision would not have been as successful without their help!

Ok... now for the photos!!
We will start in the hallway! Our building used to be a middle school so we have lockers! 

They are great for storing backpack and other items! 

As you can see I am sporting the polka-dot theme! 


Just as you enter the room, custom made mailboxes and our classroom calendar. 


The two posters above will be the foundation for my classroom this year.  "We are teachers AND learners" and "None of us is as smart as ALL of us." (posters from Office Max!)
White board and wish list! 
Writing Center, notice the wonderful cabinet made by Phil Pickett!


Six Trait Posters and computer tables! 
iPad cart and rules! 


I hope you enjoy my photos.  I am so excited that my vision came true and am looking forward to year 8 in third grade!


Sunday, August 11, 2013

Addicted... this might become a problem!

Through my random conversations, pinterest stalking, and proteacher obsessing (I can't remember which)...let's just say, sometime over the summer,  I learned of a little secret that I feel will be the vain of my bank account.  DO-IT YOURSELF posters!


Ok, so here's how it works...

I start off with the font.  If you are anything like me, you love a cute font.  I typically do my font searching over on dafont, 1001 free fonts, or fontspace.  Once I have chosen my font of choice, I start creating my document in Microsoft Publisher.  Be sure to choose 11 x 17 blank sized paper.

When searching for an image to use as your background, I suggest going to pixabay.  Tony Vincent, a guru in the technology and education world, suggests this website as the go to source for free images and backgrounds.

After that just start playing around and creating your posters.  As you finish, save your file as a PDF.  This will ensure that your printing will come out perfectly.

Once you have saved, upload your document to OfficeMax and in a few short days you will have a beautiful poster, and guess what... it only costs $1.25!
Check out some of my other posters....
This is going at the front of the room to encourage cooperation and community building. 

I made several of these for my Problem Solving Strategies bulletin board.


If you are interested in accessing some of these backgrounds and borders check out  Kimberly Geswein's Fonts (KG fonts) over on her blog: Fresh and Original

Please feel free to comment below if you have any additional questions.


Sunday, August 4, 2013

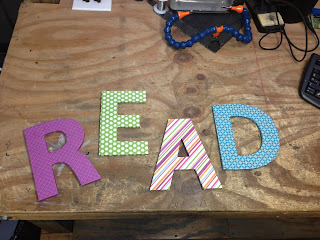
R-E-A-D

R-E-A-D


In the efforts to continue all of my back to school projects, I have disciplined myself into accomplishing 1-2 crafts a day.  Hopefully if I keep myself on track, I will have a wonderful new classroom full of DIYs!

Today's project is my READ sign that I plan on hanging above my classroom library.

Materials you will need:

 - Mod podge ( I prefer the matte version)

       
- Cardboard/wood letters (the cardboard letters that I found were much cheaper than the wood.   I believe I went to Hobby Lobby for them.)
- Scrap paper.


The Process:

Really this project is SUPER EASY!  All you need to do is pick out your paper that you want to use.  You can do the same pattern for all four letters, or you can pick different patterns.  I preferred the different patterned paper.

Once you have decided what paper to use, take your mod podge and cover the entire front of the letter.  Flip the letter upside down and stick it to the backside of your patterned paper.  Let it sit for a few minutes will doing the same process to all four letters.

After the letters have dried, take an exacto knife and cut the sides of your letter.  I would cut about a 1/4 of an inch out from the letter.  This will allow enough paper to cover the sides.

Again take your mod podge and cover the sides of your letters with the extra paper.  With round shapes, I have found it to be easier to cut the paper into sections so that you don't wrinkle the paper on the sides.

Once you have completed the steps, allow the letters to dry!


Enjoy!