Tuesday, November 19, 2013

Common Core: My reflection

              
I have finally gotten to the point in my busy schedule to take a moment and reflect on the past quarter and a half.  First, I must say, it is hard for me to believe that we are almost halfway through the first semester.  Time is really flying by.  

As I reflect on this year, one thing keeps coming to the forefront of my mind, common core. Now, it is possible that Common Core is the first thing I think of because at my school we are living and breathing the shifts of common core.  Our journey began last year when we analyzed and reorganized our math series to fit the needs of common core and has continued into this year with our ELA instruction.  We have focused our communication arts instruction on nonfiction, annotation and our seven keys to comprehension.  

I am in awe at the effects I have already seen in my own professional development, thinking and lesson implimentation.  I feel as though I am digging deeper into content and asking students to solve real world problems, research topics and become an important piece of the classroom community. 

Currently, my third grade students and I are deep into our second research project of the year.  Students were given a topic to investigate such as: Sun, Jupiter, Rockets, Moon, etc. Students learned how to use the Big6 information problem-solving model to integrate information, search and use skills along with technology tools in a systematic process. They then are able to find, use, apply, and evaluate information for specific needs and tasks.   
With the help of Mrs. Halfmann our librarian, students used their researching skills to find appropriate articles on various internet databases such as searchasarus and ebscohost.  They then used their reading comprehension skills to attack and summarize their articles. 


As students continue through this research project, they are learning how to cite sources, develop bibliographies and synthsize information.  Later this week we will begin focusing on our presentations and how we will analyze the information that has been collected. (stay tuned!)
 
While many people might argue that common core is unrealistic, or perhaps unattainable. I would challenge that this year I have seen low learners excited about investigative research, willing to make mistakes not even knowing that they were learning.  I could not have imagined that a third grade student on a first grade reading level would be able to cite her sources or create an imovie on Uranus. But it is happening.  These learning experiences are happening without struggle.

I am embracing the common core, although, it might not be perfect, I am already seeing positive benefits in both my students and in my instructional abilities.  Thank you to my school district administration, for providing me the knowledge and support to move forward with my learning.  I would also like to thank my colleagues for also diving in and doing what is BEST for students.  

I know that I will continue seeing the positive impact of common core in my students this year. 

"We are all teachers and learners"


Sunday, September 29, 2013

Homecoming Extravaganza


If you would have asked me 8 years ago if I would ever have imagined taking a class of third graders and ipads to the biggest football game a rural community has ever seen... I would have asked you if you were insane!  Maybe I am insane, or maybe like my father says (I am fearless). I did it.

Two weeks ago a colleague of mine, (another crazy teacher), called me on a Sunday evening.  "Ok, I have this idea, it is either insane, or awesome".... and of course I agreed that it was probably both insane and awesome... Lets do it!  Brian and I got together a devised a plan of attack in which students and their parents would met us at the homecoming parade and the game to video tape, interview, and document the events of Homecoming in a rural community.

What followed this planning, coordinating of high school students, parents, administration, was something that I will remember forever.  Students were engaged, excited...literally skipping across the football field in attempts to video tape or interview a band member or homecoming candidate.  (I won't mention that they were also holding an ipad while skipping). Watching 20 + students with iPads in hand video taping, engaged, and excited to interview patrons of the game was amazing.

Somewhere between, a student of mine weaseling his way through 75 high school students to video tape the homecoming court, or our students turning into the paparazzi with the homecoming queen, I thought we were going to get kicked off the field.  Thankfully, Mr. McDavitt and I were able to round up our ducklings and get them off the field before one of the boys asked to take a candidate home with them! :)

It's moments like this, I love my profession.  It's moments like this, I remember why I chose to do what I do. It's moments like this I will remember forever.  

I cannot wait to continue on this learning journey with my students this year in hopes that we continue thinking 'outside of the box' and make learning come to life for students.

Check out Mr. McDavitt's blog for his view and fabulous post on this experience... (here)

Thursday, September 5, 2013

Student Tracker Board


I'm BACK!!  I always knew the beginning of the year was stressful, but I feel that this year my stress level has  hit a new point!  Co -teaching, ipads, new ELA curriclum, Common Core and Math, and a new bunch of kiddos has rendered me insane!!  No not really, lets just say, there are millions of reasons I have been a way for a few weeks but I am glad to be back.

I am happy to report that although I am very stressed out with school, I am very excited for this new year.  The ipad activities are going great and my kids are getting into the swing of third grade.  I can't wait to continue through the school year and watch these kiddos grow into amazing learners!

Ok, now that I have explained why I have been away for so long, I am excited to post on a new project.

In my 8 years of teaching, I typically have the moment where I am calling, calling, calling for a student, only to find out that the students is... in the bathroom, at the nurse... etc.  Having 25,26, or now 27 third graders, it is hard to keep track of all of those bodies.  This board below allows you to quickly assess who is in the room and if students are gone, and where they are.


My inspiration came from pinterest and another great teacher blogger: Second Grade Style
 

HOW TO: 

 The Materials: 
1.  Grab a cookie sheet, something cheap... I would suggest a large size.  Be sure it is magnetic.
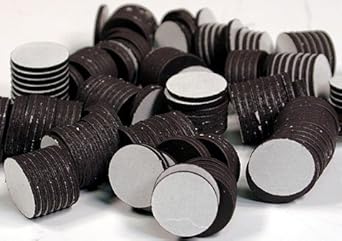
2. You will also need heavy duty magnets. Something similar to below: 
 
  You will need enough for the number of students in your class.
3.  Modgepodge 
4. Ribbon
5. Scrapbooking paper, your choice!

The Steps:  

Once you get all your materials, modge podge a piece of scrapbooking paper to your board.  You will notice my board is not a cookie sheet,  I was fortunate that my boyfriend is a welder and was able to cut out a 12 x 12 sheet of metal for me... but like I said this will also work with cookie sheets.  You just may need to use more than one sheet of scrapbooking paper to cover the entire cookie sheet.

If preferred, you can also spray paint your board if you choose, however I troubleshot this and the paint quickly peeled off as the students used it. 

You will want to drill two small holes at the top of your board to string your ribbon through to hang. 

After the paper has been stuck on, take your ribbon and section out your board.  Use modgepodge or hot clue to adhere the ribbon.  Stick on your signs in the appropriate spots.  

Next, take your magnets and place numbers on each magnet.  Place the magnets on your board.  I would suggest using hot glue on your magnets.

The board will need a few minutes to dry and then it should be ready to go for your classroom! 

I would be happy to share my file with the pieces ready to print as needed.  Just comment below.


- Happy Crafting!

Wednesday, August 14, 2013

It's official!! My classroom is DONE!

I am SOOO excited to annouce that  after days and weeks of work, (Seriously started the end of July)my classroom is DONE! Just in time for a successful back to school night full of lots of families and third graders! (27 to be exact).  I am thrilled with how my room turned out and I hope that you enjoy looking at my new favorite place.

I have to say, I had lots of family and friends jump on board to help me with some of my projects.  My chair backs were painstakingly crafted by my mom and I on Friday afternoon.  My wonderful boyfriend created my writing center shelf that I love, and of course as I mentioned before, my colleague Brian, who helped me move and move file cabinets. My classroom vision would not have been as successful without their help!

Ok... now for the photos!!
We will start in the hallway! Our building used to be a middle school so we have lockers! 

They are great for storing backpack and other items! 

As you can see I am sporting the polka-dot theme! 


Just as you enter the room, custom made mailboxes and our classroom calendar. 


The two posters above will be the foundation for my classroom this year.  "We are teachers AND learners" and "None of us is as smart as ALL of us." (posters from Office Max!)
White board and wish list! 
Writing Center, notice the wonderful cabinet made by Phil Pickett!


Six Trait Posters and computer tables! 
iPad cart and rules! 


I hope you enjoy my photos.  I am so excited that my vision came true and am looking forward to year 8 in third grade!


Sunday, August 11, 2013

Addicted... this might become a problem!

Through my random conversations, pinterest stalking, and proteacher obsessing (I can't remember which)...let's just say, sometime over the summer,  I learned of a little secret that I feel will be the vain of my bank account.  DO-IT YOURSELF posters!


Ok, so here's how it works...

I start off with the font.  If you are anything like me, you love a cute font.  I typically do my font searching over on dafont, 1001 free fonts, or fontspace.  Once I have chosen my font of choice, I start creating my document in Microsoft Publisher.  Be sure to choose 11 x 17 blank sized paper.

When searching for an image to use as your background, I suggest going to pixabay.  Tony Vincent, a guru in the technology and education world, suggests this website as the go to source for free images and backgrounds.

After that just start playing around and creating your posters.  As you finish, save your file as a PDF.  This will ensure that your printing will come out perfectly.

Once you have saved, upload your document to OfficeMax and in a few short days you will have a beautiful poster, and guess what... it only costs $1.25!
Check out some of my other posters....
This is going at the front of the room to encourage cooperation and community building. 

I made several of these for my Problem Solving Strategies bulletin board.


If you are interested in accessing some of these backgrounds and borders check out  Kimberly Geswein's Fonts (KG fonts) over on her blog: Fresh and Original

Please feel free to comment below if you have any additional questions.


Sunday, August 4, 2013

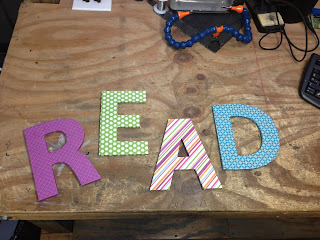
R-E-A-D

R-E-A-D


In the efforts to continue all of my back to school projects, I have disciplined myself into accomplishing 1-2 crafts a day.  Hopefully if I keep myself on track, I will have a wonderful new classroom full of DIYs!

Today's project is my READ sign that I plan on hanging above my classroom library.

Materials you will need:

 - Mod podge ( I prefer the matte version)

       
- Cardboard/wood letters (the cardboard letters that I found were much cheaper than the wood.   I believe I went to Hobby Lobby for them.)
- Scrap paper.


The Process:

Really this project is SUPER EASY!  All you need to do is pick out your paper that you want to use.  You can do the same pattern for all four letters, or you can pick different patterns.  I preferred the different patterned paper.

Once you have decided what paper to use, take your mod podge and cover the entire front of the letter.  Flip the letter upside down and stick it to the backside of your patterned paper.  Let it sit for a few minutes will doing the same process to all four letters.

After the letters have dried, take an exacto knife and cut the sides of your letter.  I would cut about a 1/4 of an inch out from the letter.  This will allow enough paper to cover the sides.

Again take your mod podge and cover the sides of your letters with the extra paper.  With round shapes, I have found it to be easier to cut the paper into sections so that you don't wrinkle the paper on the sides.

Once you have completed the steps, allow the letters to dry!


Enjoy!

Wednesday, July 31, 2013

Summer has come...and gone!

Wow!  The time has surely flown by this summer! My back to school panic started a little earlier than normal.  I was fortunate to have been chosen for a district iPad grant which will allow me to have a 2:1 ratio in my classroom next year!  However, new technology always comes with new ideas, new professional development, which in turn does not allow me to sleep, relax or do ANYTHING but school!  I guess that's when you know you are excited to begin a new year.

I also thought it would be a great idea to move into a bigger room this past May, so while developing Ipad lessons, I am also redoing, structuring and decorating my new classroom!  Needless to say, I have been in school mode for the past few weeks.  Hopefully, you haven't made that transistion quite yet, and are still enjoying time by the pool reading your romance novel.

I am looking forward to sharing some of my DIY projects with you that I plan to incorporate into my classroom for this upcoming school year.

File Cabinet Redo

I inherited these lovely file cabinets my first year of teaching (8 years ago!) stickers, dented drawers, ancient worksheets and all!
They have seen better days! 

 Instead of using my time wisely and actually cleaning out the drawers, I decided to change their appearance.I found this amazing file cabinet redo on First Grade Fairy Tales, that I couldn't resist! 


Materials: 

Gray spray paint (about two bottles per cabinet)
Purple contact paper from amazon (it cost about 20.00 but had PLENTY for all three cabinets).


Once you have gathered your supplies, spray paint your cabinets.

Being that file cabinets are not mobile, it was nice having another teacher, Mr. McDavitt, help me move them.  This went surprisingly well for me, considering my history of clumsiness and broken bones.  We only ended up spilling one cabinet over in the courtyard, oops!
We safely got this one to the courtyard! 

Before I spray painted these specific cabinets I had to get all the stickers off.  Hopefully the cabinets you have inherited do not have the same problem.  Any razor blade will do the trick.  I got most of the stickers off the cabinet and then got them spray painted.  Thankfully, no sanding was needed for this metal.

After the cabinets had dried, Brian and I moved them back inside and I began adhering the contact paper.  The size of each drawer was 11.5 x 13.5. I would suggest allowing a little extra to cover your entire drawer, the paper trims very easily.

Be sure before you adhere your contact paper to take off all of your handles and locks.  This again, was quite the task.  Fortunately, Mr. McDavitt was able to help get the handles off.  I came out with only a few scratches and bruises,  I say that's a win!

Once all of your handles have been removed, attach contact paper and smooth from the middle outwards.  This will allow you to get most of the bubbles out of your contact paper.  Attach your handles back to your drawers and viola,  a new set of beautiful file cabinets!!


Now if only I can get the motivation to clean them out.